Creating skins
How to create a new skin using Meters on Demand and upload it to GitHub. This guide does not cover how to actually develop Rainmeter skins. Refer to the Rainmeter manual for that.
Requirements:
Meters on Demand
- Download it from GitHub
Git
- Install it with winget
winget install Git.Git - Install it with chocolatey
choco install git - Download it from git-scm
GitHub account
Creating a new skin
Open any shell (cmd, powershell, wt) and run
mond init "My epic skin"If you haven't set your config editor in Rainmeters settings, mond will just open the created folder for you.
Initializing a git repository
After creating your skin, you can start making changes and developing it but you should start using git as soon as possible to make the most of it.
If you don't know what git is (if you already know go to the next chapter bruh), briefly, it tracks the history of your code. If properly used, it will bring you a sense of confidence in making changes to your skin as it automatically tracks what has changed, lets you revert things easily if it doesn't work out and backs up your code in the absolute worst case of your factory script removing everything you worked on.
This guide only covers the very basics of git. You should learn more on your own. To get started run the following commands:
WARNING
The following commands should be run in your #ROOTCONFIGPATH# \My epic skin, not in your #SKINSPATH# \Skins. If you're using the shell from before, do cd ".\My epic skin" first.
git init
git add .
git commit -m "My first commit :D"
At this point, git will ask you to tell it who you are. If it doesn't error or ask you anything, you can skip these commands
git config --global user.name <your github username>
git config --global user.email <your github email>
This sets your git username and email globally, so you don't have to do this again. Notice that the email you use here is public information. It doesn't strictly have to be the actual email you used for GitHub.
After setting your user information run the commit again.
git commit -m "My first commit :D"This time it should succeed.
GitHub repository
Log into your GitHub account and make a new repository. It can be called anything.
When you make the repository, do NOT tick the "Add a README file" box or add any .gitignore template or license.

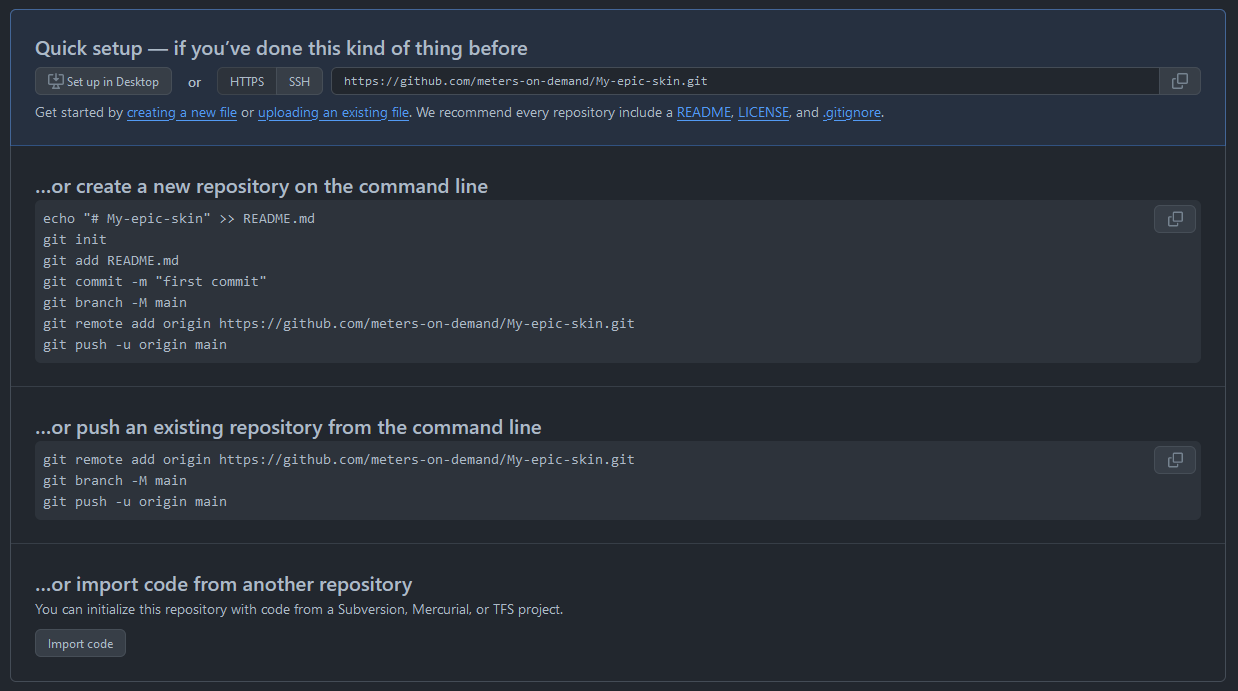
After creating the repository, GitHub will show you the following page:

We already did the first half so you only need to copy the three commands from the "push an existing repository" section.
Copy these commands from GitHub as the information is already filled in.
git remote add origin https://github.com/<username>/<repo name>.git
git branch -M main
git push -u origin main
After running these, refresh the GitHub page. Your skin files should now show up. Congratulations, your skin is now uploaded to GitHub!
Continuing development
Now that you've made your first git repository, you probably want to know how to use it when developing.
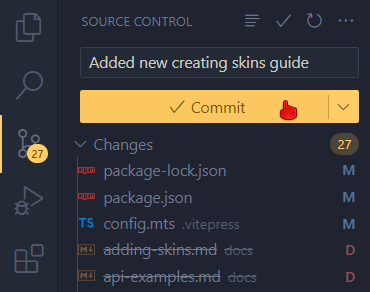
If your IDE has git integration, it's very easy to start using git. In VS Code for example, whenever you're in a git repository, your changes are automatically tracked and displayed in the Source Control tab. Using the tab you can create commits and push them to GitHub with two clicks.

And that's it! If you have git integration in your IDE, feel free to move onto publishing skins
Without git integration in your development tools, you will need to add, commit and push using git commands:
git add .Adds all changes made to all files to the commit. VS Code git integration does this automatically when committing.
git commit -m "Message"Creates the commit. A commit message is mandatory, if you don't specify it with -m, git will open a scary vim editor for you to write it in.
git pushPushes the commit to the remote. So "uploads your changes to GitHub" in english.